
 In this video you are going to learn how to do an underground dog fence installation. Whether you have gone and purchased or thinking about buying one I'm sure you'll find the video worth watching. Personally I prefer to plan out my layout before buying so that I have a good idea of everything I will need.
Therefore the first stage is to plan your layout of what areas you want to restrict your dog to. This will give you a good idea of what length of wire and other equipment to order. Kits come in a variety of sizes such as wire lengths, wire gauge thickness, number of dog collars etc.
Below are my top 2 recommended kits which would get you off to a good start. I have chosen both because they have everything required and are expandable. You may want to cover a larger area in the future or even add other collar for more dogs.
But mainly because they offer a 14 gauge wire. If not important to you then it certainly is to me. A thinner gauge will no doubt do the job, but for how long. To me these thin wires are much to flimsy and I feel much more confident installing the thicker gauge.
Think about this for a moment. It’s a fact that most problems with in-ground pet fences are associated with wiring problems and more often than not with low grade wire. These thin wires were not intended to be installed underground exposed to all the elements of the weather and traffic. They are more suited to internal installations. The hassle starts when attempting to find any broken areas of the wire. Often it is just as quick to rip the whole lot out and start again. Meaning more expense, time and trouble and possibly a lost pooch.
I have also included other items that you may need. Although my recommended kits do have a lightning & surge protector included, if you choose another kit that does not include one it makes sense to add it to your shopping list. Other items are included in that list which you may or may not need depending on which kit you buy. Others you will need if you intend to expand.
Supplies Needed
eXtreme In-Ground Electric Dog Fence Easy Installation D.I.Y. Kit
SportDOG 100 Acre Pet Fence System SDF 100A In-Ground Kit
Dog Fence Lightning & Surge Protector M1DF-69
Electric Dog Fence Wire Splice Kits
Heavy Duty 14 Gauge Dog Fence Wire (If you choose to expand)
Twisted Electric Dog Fence Wire For Connecting Transmitter To Perimeter Wire
Replacement Petsafe Stay and Play Invisible Fence Receiver Collar (For a second dog)
Pet Fence Staples (If you have an area you need to lay perimiter wire on the surface)
Step by Step Instructions
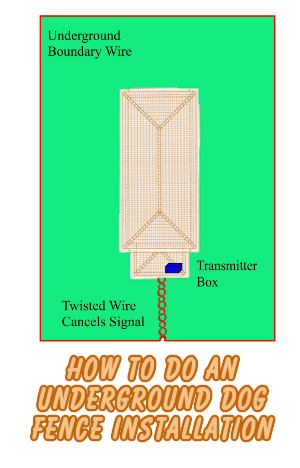
Once you have bought your preferred underground dog fence kit it’s time to plan your layout if you haven't already done so. Make sure that the transmitter is protected from the weather. Now you need to lay out the boundary wire and plug in the transmitter to your lightning & surge protector socket. DON'T BURY THE BOUNDARY WIRE AT THIS STAGE as you will need to test everything first. Another tip is, avoid laying wire at sharp angles as this can interfere with the radio signal. A more gradual curve would be better.So one end of the wire will need to be connected to the surge protector. Placed around the area of the yard you intend to protect and connected back into the surge protector. Where the two ends of the boundary wire leave and enter the home or outhouse they will need to be twisted all the way before being connected to the surge protector. At least one twist per inch or even more. Some kits come with separate twisted wire some don't. The purpose is to protect the dog from being shocked in the home our outhouse. Twisting the wire accomplishes this. The video explains how to join wires if you need to add more to extend the protected area. Although the 1000 feet supplied with both my recommended systems should be long enough for most folk.
Testing
Now go back to the transmitter to set the boundary width. Turn the adjusting control all the way up to ten when the light will come on and there is no beeping. Then turn it back down until you hear it beeping. Now turn it back up two numbers and start testing.
Take the collar receiver and turn it on, it should flash a red number as well as make a number of bleeps. If it bleeps 5 times, that means that it is set at level 5. If 3 beeps, it's set at level 3. This is the level of the shock. To check the battery strength you will either see a red light or green when you switch it on. If red replace the battery if green your fine.
With everything switched on take the dog collar outside, crouch down to simulate the dog height and slowly walk towards the boundary wire, you will hear the collar bleeping. Having a wider containment field will mean, the less chance of the dog running through it and into the shock area. You can adjust the transmitter up or down a bit and re-test. Continue completing these tests at various sections of the wire until you’re completely happy.
If you have used twisted wire in the yard to connect to the boundary wire, walk the collar over it to ensure there is no activation here. Check out other safe areas as well as inside the house to make sure there are no stray signals. If there are any, then your boundary wire could be too close the outside utility lines. Simply move your wire back a bit until it is within a safe distance from the utility lines.
I differ from the video at this point as I wouldn't bury the cable until I had done all these tests. NOW YOU CAN GO AHEAD AND BURY THE BOUNDARY WIRE.
Use a flat edged spade and make a cut in the lawn about 2 to 3 inches deep and at an angle of between 20 and45 degrees. This angle makes it easier to close after the wire has been pushed into position. Don't have the wire to taught, leave some slack to allow for expansion and contraction caused by weather temperature changes.
With the dog collar in your hand walk towards the wire and when the warning sound is heard put a flag in. Continue around the area with the same procedure. The flags act as a visual aid for the dog and you will gradually remove them after the dog has been properly trained.
Now you and your dog are ready to have some fun with the training process.
Installing the system should not be too difficult for most people. Perhaps digging in the wire will be the most difficult for some. Watching the video and reading though my notes, which have other suggestions should help. At the end of the day, you will have the peace of mind knowing that your loving dog will be so much safer. Providing you don't put it off and go ahead and carry out your underground dog fence installation.